Rails Rate Limiting: rate_limit in Rails 8 and Rack::Attack in Production

Rails rate limiting has two good options today. Since Rails 7.2, controllers have a built-in rate_limit macro (rate_limit to: 10, within: 3.minutes, only: :create) that answers 429 Too Many Requests once a client exceeds the limit. For anything that has to happen before routing, such as throttling every request per IP, banning scanners or adding a Retry-After header, Rack::Attack is still the tool. This guide sets up both for a production app: login and password-reset limits, per-user API limits, a shared counter store so limits hold across Puma workers, the real client IP behind proxies and CDNs, and tests that prove the limits work.
TL;DR
- Use
rate_limitin controllers for logins, signups, password resets and per-user API limits. Use Rack::Attack for global per-IP throttles and blocklists.- Both count in a cache store. It must be shared (Redis or Solid Cache):
:memory_storecounts per process, and:null_store, the development and test default, never limits anything.- Behind a CDN or load balancer, configure trusted proxies, or every visitor shares the proxy’s IP and one bucket.
- Limit logins by IP and by email, so attackers can’t rotate IPs against one account or one IP against many accounts.
- Return
429with aRetry-Afterheader, log every throttle, and test limits with a real cache store in the test environment.
Table of Contents
- rate_limit or Rack::Attack: which one should I use?
- Prerequisites
- Step 1: Rate limit logins and password resets with rate_limit
- Step 2: Rate limit an API per user or API key
- Step 3: Use a shared store for the counters
- Step 4: Get the real client IP behind proxies
- Step 5: Add Rack::Attack for global throttles and bans
- What limits should I use?
- Verify it works
- How Heroku, Render, Fly.io, Upsun and Enkihost handle rate limiting
- Troubleshooting
- Author Perspective: limits are a product decision
- Rate limiting on Enkihost
- FAQ
- Sources
rate_limit or Rack::Attack: which one should I use?
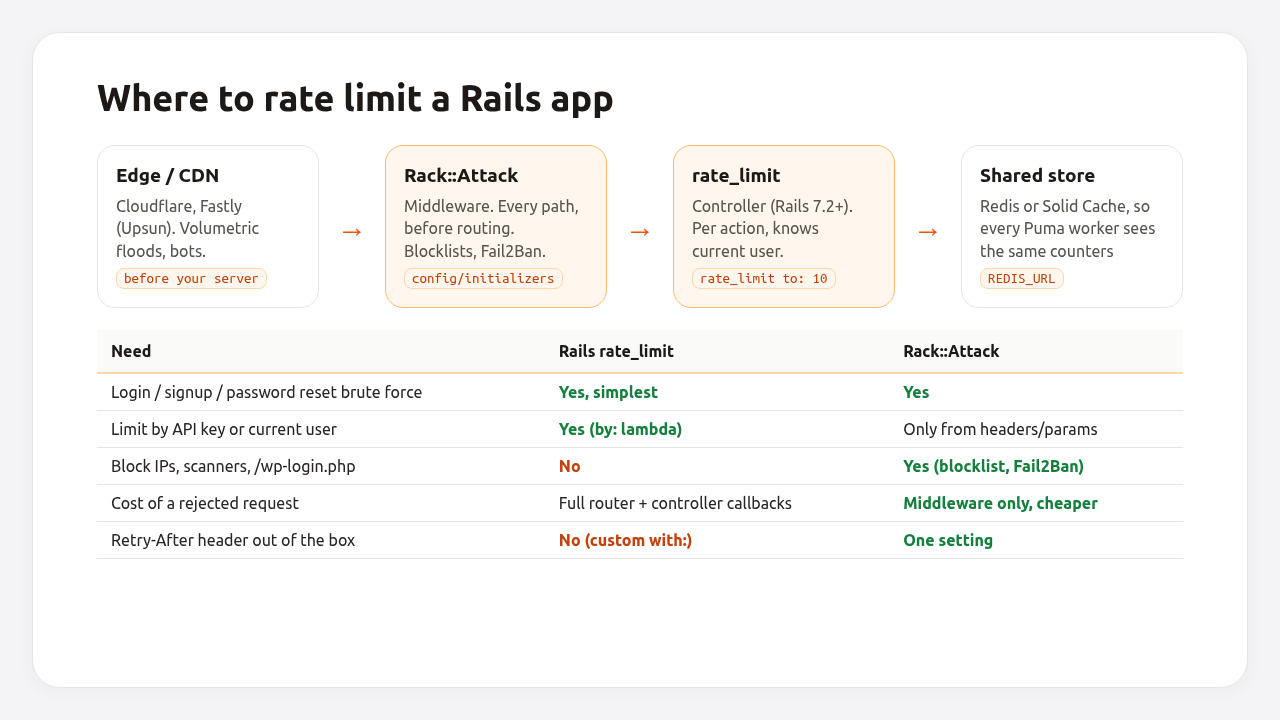
Use rate_limit for limits tied to an action or a user, and Rack::Attack for limits that apply to every request before Rails routes it. Most production apps end up with both: rate_limit on the sensitive endpoints, and one broad Rack::Attack throttle per IP as a safety net.
rate_limit (Rails 7.2+) |
Rack::Attack | |
|---|---|---|
| Where it runs | before_action in a controller |
Rack middleware, before routing |
| Identifies clients by | request.remote_ip by default, or any lambda (Current.user.id, API key) |
Any value from the Rack request (IP, header, param) |
| Blocklists / bans | No | Yes (blocklist, Fail2Ban, Allow2Ban) |
| Default response | 429 Too Many Requests |
429, customizable, optional Retry-After |
| Extra dependency | None | rack-attack gem |
| Cost of a rejected request | Router + earlier callbacks run | Middleware only |
The edge (Cloudflare, Fastly) is a third layer for volumetric floods. It protects bandwidth, but it doesn’t know your users, so it doesn’t replace either of the two.
Prerequisites
- Rails 7.2 or newer for
rate_limit(examples use Rails 8.0 and Ruby 3.3). Thename:option, needed for more than one limit in the same controller, arrived in Rails 8. - A shared cache store in production: Redis or Solid Cache.
- For Rack::Attack, the
rack-attackgem (6.8 at the time of writing).
Step 1: Rate limit logins and password resets with rate_limit
Put rate_limit in the controller and restrict it to the action that does the expensive or sensitive work. The Rails 8 authentication generator already adds this to SessionsController:
# app/controllers/sessions_controller.rb
class SessionsController < ApplicationController
  allow_unauthenticated_access only: %i[ new create ]
  rate_limit to: 10, within: 3.minutes, only: :create,
    with: -> { redirect_to new_session_url, alert: "Try again later." }

  def new
  end

  def create
    if user = User.authenticate_by(params.permit(:email_address, :password))
      start_new_session_for user
      redirect_to after_authentication_url
    else
      redirect_to new_session_path, alert: "Try another email address or password."
    end
  end

  def destroy
    terminate_session
    redirect_to new_session_path
  end
end
That limit is per IP: 10 sign-in attempts per 3 minutes. An attacker with many IPs can still try passwords against one account, so add a second limit keyed by the email address being tried. With two limits in one controller, each needs a name::
# app/controllers/sessions_controller.rb
class SessionsController < ApplicationController
  allow_unauthenticated_access only: %i[ new create ]

  rate_limit to: 10, within: 3.minutes, only: :create, name: "per-ip",
    with: -> { redirect_to new_session_url, alert: "Try again later." }

  rate_limit to: 5, within: 15.minutes, only: :create, name: "per-email",
    by: -> { params[:email_address].to_s.strip.downcase },
    with: -> { redirect_to new_session_url, alert: "Too many attempts for this account. Try again in 15 minutes." }

  # new, create, destroy as above
end
Normalize the email the same way your login does. Otherwise Bob@example.com and bob@example.com get separate counters.
Password resets send email, which costs money and can be abused to spam a victim’s inbox. Limit them per IP and per address:
# app/controllers/passwords_controller.rb
class PasswordsController < ApplicationController
  allow_unauthenticated_access

  rate_limit to: 5, within: 1.hour, only: :create, name: "reset-per-ip",
    with: -> { redirect_to new_password_path, alert: "Try again later." }

  rate_limit to: 3, within: 1.hour, only: :create, name: "reset-per-email",
    by: -> { params[:email_address].to_s.strip.downcase },
    with: -> { redirect_to new_session_path, notice: "Password reset instructions sent (if user with that email address exists)." }

  # new, create, edit, update...
end
Pro Tip: in the per-email limit, show the same message as a successful request. A different message tells an attacker which addresses have accounts.
How does rate_limit count requests?
It’s a fixed window counter. On each request, Rails increments a cache key built from the controller, the limit’s name and the by: value, with an expiry of within. When the counter exceeds to:, the with: callable runs (by default, a 429 response). Because windows are fixed, a client can make up to twice the limit across a window boundary: 10 requests at the end of one 3-minute window and 10 at the start of the next. For login protection that’s fine. If you need a strict sliding window, use Rack::Attack or the edge.
Step 2: Rate limit an API per user or API key
For APIs, limit per account rather than per IP, so customers behind one corporate NAT don’t share a quota, and so one customer with many servers can’t exceed theirs. The by: lambda runs in the controller, so it can use the authenticated user:
# app/controllers/api/base_controller.rb
class Api::BaseController < ActionController::API
  include ActionController::HttpAuthentication::Token::ControllerMethods

  before_action :authenticate_api_key!

  rate_limit to: 1_000, within: 1.hour, name: "api-hourly",
    by: -> { @api_key.id }, with: :render_rate_limited
  rate_limit to: 60, within: 1.minute, name: "api-burst",
    by: -> { @api_key.id }, with: :render_rate_limited

  private

  def authenticate_api_key!
    @api_key = authenticate_with_http_token { |token, _| ApiKey.active.find_by(token: token) }
    render json: { error: "Unauthorized" }, status: :unauthorized unless @api_key
  end

  def render_rate_limited
    response.set_header("Retry-After", "60")
    render json: { error: "Rate limit exceeded" }, status: :too_many_requests
  end
end
The order matters. rate_limit registers a before_action, so it runs after authenticate_api_key! only because it’s declared after it. Unauthenticated requests are rejected before they reach the limit, which is what you want: they don’t consume a customer’s quota.
In a real app, store a digest of the token rather than the token itself, and look it up by digest.
Step 3: Use a shared store for the counters
Every limit is only as good as its counter store. By default, rate_limit uses the controller’s cache store, which is config.action_controller.cache_store if set, otherwise config.cache_store.
| Store | Shared across Puma workers and servers? | Rate limiting works? |
|---|---|---|
:null_store (dev default without dev:cache, test default) |
— | No, nothing is ever counted |
:memory_store |
No, one counter per process | Partly: the real limit becomes to × processes |
:file_store |
Only on one server | Only for single-server apps |
:solid_cache_store (Rails 8 production default) |
Yes, via the database | Yes |
:redis_cache_store |
Yes | Yes, and the cheapest per increment |
With 3 Puma workers and :memory_store, a limit of 10 is really 30, and it resets on every deploy. The Puma workers and threads guide explains why each worker has its own memory.
If your main cache is a store you sometimes clear, or you don’t want rate-limit writes competing with cache entries, give the counters their own Redis store:
# config/initializers/rate_limit_store.rb
RATE_LIMIT_STORE =
  if ENV["REDIS_URL"].present?
    ActiveSupport::Cache::RedisCacheStore.new(url: ENV["REDIS_URL"], namespace: "rate-limit")
  else
    ActiveSupport::Cache::MemoryStore.new
  end
# app/controllers/sessions_controller.rb
rate_limit to: 10, within: 3.minutes, only: :create, store: RATE_LIMIT_STORE
The fallback to MemoryStore keeps limits working in development and tests, and lets assets:precompile run in a Docker build without REDIS_URL. How to configure redis_cache_store itself (timeouts, error handling, maxmemory-policy) is in Rails Redis caching in production.
Step 4: Get the real client IP behind proxies
rate_limit uses request.remote_ip and Rack::Attack uses request.ip. Both skip private-network proxies, but they don’t trust public ones like Cloudflare. Behind a CDN, every request then appears to come from a handful of CDN IPs, and all your users share a few counters. The first busy hour, everyone gets 429s.
Tell Rails which proxies to trust. For Cloudflare, add its published ranges:
# config/initializers/trusted_proxies.rb
cloudflare_ranges = %w[
  173.245.48.0/20 103.21.244.0/22 103.22.200.0/22 103.31.4.0/22
  141.101.64.0/18 108.162.192.0/18 190.93.240.0/20 188.114.96.0/20
  197.234.240.0/22 198.41.128.0/17 162.158.0.0/15 104.16.0.0/13
  104.24.0.0/14 172.64.0.0/13 131.0.72.0/22
  2400:cb00::/32 2606:4700::/32 2803:f800::/32 2405:b500::/32
  2405:8100::/32 2a06:98c0::/29 2c0f:f248::/32
].map { |range| IPAddr.new(range) }

Rails.application.config.action_dispatch.trusted_proxies =
  ActionDispatch::RemoteIp::TRUSTED_PROXIES + cloudflare_ranges
Cloudflare publishes the current list at https://www.cloudflare.com/ips-v4 and /ips-v6. Refresh it occasionally.
Then check what Rails sees:
# app/controllers/debug_ip_controller.rb (temporary, remove after checking)
class DebugIpController < ApplicationController
  def show
    render plain: "remote_ip=#{request.remote_ip} ip=#{request.ip} xff=#{request.headers['X-Forwarded-For']}"
  end
end
Open it from your phone on mobile data and compare remote_ip with what a “what is my IP” site shows. They must match.
Never trust X-Forwarded-For from everywhere (for example by taking its first value yourself). Clients can set that header to anything, which turns your per-IP limit into no limit.
Step 5: Add Rack::Attack for global throttles and bans
Rack::Attack runs before routing, so it’s the right place for a broad per-IP throttle and for blocking scanners that hit /wp-login.php and /.env thousands of times a day.
# Gemfile
gem "rack-attack", "~> 6.8"
Rails inserts the middleware automatically. Configure it in an initializer:
# config/initializers/rack_attack.rb
class Rack::Attack
  # Shared counters across workers and servers.
  if ENV["REDIS_URL"].present?
    Rack::Attack.cache.store = ActiveSupport::Cache::RedisCacheStore.new(
      url: ENV["REDIS_URL"], namespace: "rack-attack"
    )
  end

  # Use Rails' remote_ip so the trusted proxy configuration from Step 4 applies.
  def self.client_ip(req)
    ActionDispatch::Request.new(req.env).remote_ip
  end

  # Health checks and local requests are never limited.
  safelist("health-and-local") do |req|
    req.path == "/up" || %w[127.0.0.1 ::1].include?(req.ip)
  end

  # Broad safety net: 300 requests per 5 minutes per IP, assets excluded.
  throttle("req/ip", limit: 300, period: 5.minutes) do |req|
    client_ip(req) unless req.path.start_with?("/assets/")
  end

  # Logins: per IP and per email, as a second layer to the controller limits.
  throttle("logins/ip", limit: 20, period: 5.minutes) do |req|
    client_ip(req) if req.path == "/session" && req.post?
  end

  throttle("logins/email", limit: 10, period: 15.minutes) do |req|
    if req.path == "/session" && req.post?
      req.params["email_address"].to_s.strip.downcase.presence
    end
  end

  # Ban scanners for an hour after 3 probes in 10 minutes.
  SCANNER_PATHS = %r{\A/(wp-admin|wp-login\.php|xmlrpc\.php|\.env|\.git|phpmyadmin)}i

  blocklist("fail2ban/scanners") do |req|
    Rack::Attack::Fail2Ban.filter("scanners-#{client_ip(req)}", maxretry: 3, findtime: 10.minutes, bantime: 1.hour) do
      req.path.match?(SCANNER_PATHS) || req.path.end_with?(".php")
    end
  end

  # 429 with Retry-After and a JSON body.
  self.throttled_responder = lambda do |req|
    match_data = req.env["rack.attack.match_data"]
    now = match_data[:epoch_time]
    retry_after = match_data[:period] - (now % match_data[:period])

    [429,
     { "content-type" => "application/json", "retry-after" => retry_after.to_s },
     [{ error: "Too many requests", retry_after: retry_after }.to_json]]
  end
end
Log every throttle and ban, so you can see what’s being limited and tune it:
# config/initializers/rack_attack_logging.rb
ActiveSupport::Notifications.subscribe(/rack_attack/) do |name, _start, _finish, _id, payload|
  req = payload[:request]
  next unless %w[throttle blocklist].include?(req.env["rack.attack.match_type"].to_s)

  Rails.logger.warn({
    event: name,
    rule: req.env["rack.attack.matched"],
    type: req.env["rack.attack.match_type"],
    ip: ActionDispatch::Request.new(req.env).remote_ip,
    path: req.path
  }.to_json)
end
Structured logs like this one are easy to search and alert on; the Rails log management guide shows how to ship them.
What limits should I use?
Start generous, log for a week, then tighten. These are reasonable starting points for a typical Rails app:
| Endpoint | Key | Limit | Why |
|---|---|---|---|
POST /session (login) |
IP | 10 per 3 min | Rails 8 generator default |
POST /session (login) |
5 per 15 min | Stops distributed guessing on one account | |
POST /passwords (reset) |
3 per hour | Each request sends an email | |
POST /registrations (signup) |
IP | 10 per hour | Slows fake account creation |
| API | API key | 60 per min, 1,000 per hour | Burst + sustained quota |
| Every request | IP | 300 per 5 min | rack-attack’s README example, catches crawlers and loops |
| Scanner paths | IP | Ban 1 h after 3 hits | Nobody legitimate requests /wp-login.php on a Rails app |
A normal page view triggers one HTML request plus Turbo Frames and fetches. With assets excluded, an active user rarely exceeds 30–60 requests per minute, so 300 per 5 minutes leaves room. If many of your users share one IP (schools, offices, mobile carriers), raise the per-IP numbers and rely more on per-account keys.
Verify it works
Check the Rack::Attack throttle from outside with a loop of plain GET requests, and watch the status codes change once the limit is reached:
for i in $(seq 1 305); do
  curl -s -o /dev/null -w "%{http_code}\n" https://example.com/
done | sort | uniq -c
#  300 200
#    5 429

curl -sI https://example.com/ | grep -i retry-after
# retry-after: 187
Don’t test the login limit with curl the same way. protect_from_forgery runs before rate_limit (it’s declared in ApplicationController), so a POST without an authenticity token gets 422 before the limit is ever counted. The InvalidAuthenticityToken guide explains that check. Test controller limits in an integration test instead, where forgery protection is off by default.
Then cover the limit with a test. The test environment uses :null_store, so give it a real store first:
# config/environments/test.rb
config.action_controller.cache_store = :memory_store
# test/controllers/sessions_rate_limit_test.rb
require "test_helper"

class SessionsRateLimitTest < ActionDispatch::IntegrationTest
  setup { ActionController::Base.cache_store.clear }

  test "blocks the 11th login attempt from the same IP within 3 minutes" do
    10.times do
      post session_path, params: { email_address: "nobody@example.com", password: "wrong" }
      assert_equal "Try another email address or password.", flash[:alert]
    end

    post session_path, params: { email_address: "nobody@example.com", password: "wrong" }
    assert_redirected_to new_session_url
    assert_equal "Try again later.", flash[:alert]

    travel 3.minutes + 1.second
    post session_path, params: { email_address: "nobody@example.com", password: "wrong" }
    assert_equal "Try another email address or password.", flash[:alert]
  end
end
If you passed an explicit store: RATE_LIMIT_STORE, clear that store in setup instead. travel only moves Ruby’s clock, which is enough for MemoryStore expiry; it doesn’t move Redis’s TTLs.
How Heroku, Render, Fly.io, Upsun and Enkihost handle rate limiting
None of the platforms rate-limits per user or per endpoint for you, so app-level limits are needed everywhere. What differs is what sits in front of the app.
| Platform | Built-in request rate limiting | What it gives you | What you still need |
|---|---|---|---|
| Heroku | None at the router | Router timeouts, no per-client limits | rate_limit + Rack::Attack, or a CDN in front |
| Render | No configurable app limits | DDoS protection at the edge | rate_limit + Rack::Attack |
| Fly.io | No per-client limits | concurrency soft/hard limits per Machine (load shedding, not per client) |
rate_limit + Rack::Attack |
| Upsun | Per-IP limiting when behind its Fastly CDN (defaults documented as 100 req/min for users, 30 for bots) | Edge 429s and a penalty box | Per-user and per-endpoint limits in the app |
| Enkihost | App-level | Managed Redis included on Ignite and Blaze, with REDIS_URL injected |
rate_limit + Rack::Attack using that Redis |
Fly’s concurrency settings deserve a note because they’re often confused with rate limiting. soft_limit and hard_limit control how many connections or requests one Machine accepts before Fly’s proxy sends traffic elsewhere or queues it. They protect the Machine from overload, not your login form from brute force.
Troubleshooting
Rate limiting does nothing in development or tests
The cache store is :null_store, which discards every write. Run bin/rails dev:cache in development, set config.action_controller.cache_store = :memory_store in test.rb, or pass an explicit store:.
Everyone gets 429 at the same time
All requests share one key, almost always because remote_ip is the proxy’s or CDN’s IP. Check with the debug action from Step 4 and configure trusted_proxies.
Limits are higher than configured
The store is per process (:memory_store), so the effective limit is multiplied by your number of Puma workers and servers. Switch to Redis or Solid Cache.
Two limits in one controller behave like one
Two rate_limit calls in the same controller without name: share a cache key, so they count into the same counter. Give each a distinct name: (Rails 8+). On Rails 7.2, combine them into one limit or move the second to Rack::Attack.
Redis errors take the site down
If Redis is unreachable, redis_cache_store logs the error and returns nil by default, so rate_limit fails open and requests go through. Rack::Attack also fails open on Redis connection errors. That’s usually the right trade-off for an app, but monitor Redis so “fails open” doesn’t silently become “no limits for a week”.
Health checks get throttled
Your platform’s health check hits /up from a fixed IP many times a minute. Safelist /up in Rack::Attack, as in Step 5, and don’t put rate_limit in Rails::HealthController.
Author Perspective: limits are a product decision
The first time I added rate limiting, I copied numbers from a blog post and locked out a client’s whole office on a Monday morning, because forty people shared one IP. Since then I treat limits as product decisions, not security settings. I start with logging-only (a Rack::Attack track rule instead of throttle), look at a week of real traffic, and then set limits a comfortable margin above what real users do. Per-account limits for anything behind login, per-IP limits only as a broad safety net, and a ban list for the obvious scanner noise. The scanner ban alone usually cuts a surprising share of log volume on a small app.
Rate limiting on Enkihost
Rate limiting needs a fast, shared counter store, and that’s the part a small app most often lacks. On Enkihost:
- Managed Redis included on Ignite (128 MB) and Blaze, with
REDIS_URLinjected, so theRATE_LIMIT_STOREand Rack::Attack configuration above work without extra setup. - Managed PostgreSQL included too, if you prefer Rails 8’s Solid Cache as the counter store.
- Per-app resource isolation, so a scanner hammering another app doesn’t eat the CPU and memory allocated to yours, and your own limits decide what reaches your code.
- Zero-downtime deploys, so tuning limits after a week of logs is a routine deploy.
- Plans: Ignite at 9 EUR per month after a 14-day free trial (2 apps, 1.0 shared vCPU, 2 GB RAM), or Blaze at 29 EUR with five apps, 5 GB of RAM, CPU priority and two Redis instances, so a shared Redis store keeps limits consistent across your apps.
See enkihost.com.
FAQ
What is the difference between rate_limit and Rack::Attack in Rails?
rate_limit is built into Rails 7.2 and later and runs as a before_action in a controller, so it can limit by current user, API key or any value the controller knows. Rack::Attack is middleware that runs before routing, so it can throttle every request by IP, block scanners and ban abusive clients. Many apps use both.
Does Rails rate_limit work with multiple Puma workers?
Only if the cache store is shared. rate_limit counts requests in the controller’s cache store, so with Redis or Solid Cache all workers and servers share the counters. With memory_store, each worker keeps its own count and the real limit is multiplied by the number of processes.
What HTTP status does Rails return when a rate limit is exceeded?
By default, 429 Too Many Requests. You can change the response with the with option, for example to redirect back to the login form with a flash message, or to render a JSON error with a Retry-After header for API clients.
How do I rate limit by user instead of IP in Rails?
Pass a by lambda to rate_limit that returns the user or API key identifier, for example by: -> { Current.user.id }. Declare the authentication before_action before rate_limit, so the user is loaded when the limit runs and unauthenticated requests are rejected without consuming anyone’s quota.
Can I use Rails rate_limit without Redis?
Yes. Rails 8 apps use Solid Cache in production by default, which stores counters in the database and is shared across processes and servers. Memory store also works but only per process, and the development and test default, null store, does not count anything.
Sources
- ActionController::RateLimiting — Rails API
- Securing Rails Applications: brute-forcing accounts — Rails Guides
- Configuring Rails Applications: trusted_proxies — Rails Guides
- rack-attack README — GitHub
- Cloudflare IP ranges — Cloudflare
- HTTP routing — Heroku Dev Center
- DDoS protection — Render Docs
- Fly Launch configuration: http_service.concurrency — Fly Docs
- Upsun Fastly rate limiting: how it works, how to tune it — Upsun Support
- 429 Too Many Requests — MDN